Stem Cells: How to learn more about them
What are stem cells?
There are 220 different cell types in the human body. Stem cells are unspecialized cells capable of renewing themselves through cell division. They can specialize into several types of cells once they have received a signal to do so. Researchers harvest stem cells from embryos. Why? Because in this early stage of development, the cells can differentiate into all cell types (skin, bone, hair, etc.) to form a fully developed being. These embryonic stem cells are known as pluripotent stem cells. There are also stem cells in the adult body, but these adult stem cells can’t specialize into all cell types. They are usually located within different organs in the body. Their job is to replace worn-out cells in a specific organ. These cells are called multipotent stem cells.
Stem cells are able to self-renew through mitotic division. What is mitosis? When a cell undergoes mitosis, it duplicates its DNA and separates into two new cells that have the same genetic code. They are two identical copies (or daughter cells) from one mother cell. These daughter cells can either remain as stem cells or differentiate into specialised cell types.
Why are stem cells important?
Because we can explain how an organism develops from a single cell through mitotic division as well as how damaged cells are replaced in adult organisms during healing processes. We can observe living stem cells under different conditions. That could lead to medical advancements in treating cancer, understanding degenerative diseases such as Alzheimer’s, or organ failures such as heart diseases.
One example of the widely used stem cell therapy is bone marrow transplantation. The bone marrow contains stem cells that differentiate into various blood cells and can treat leukaemia (cancer of blood cells) as well as other disorders of the blood.
In laboratories, scientists use stem cells to screen new drugs and develop model systems to study how the cell proliferation is regulated during normal embryonic development and to identify the causes of birth defects. Scientists also work on directing the differentiation of stem cells into specific cell types to treat diseases which require the replacement of cells and tissues in case of macular degeneration, burns or spinal cord injury.
How can we observe stem cells?
Stem cells are a very sensitive and delicate type of cells. It has always been a challenge to observe them. Traditional methods based on fluorescence tend to kill the cells. But with the new technology called holotomography and the recently developed 3D Cell Explorer microscope, we can image living stem cells in a totally non-invasive way by analysing physical properties of the cell’s organelles (i.e. their specific Refractive Index) in 3D.
Studying mitosis (cell division) in mouse embryonic stem cells
With the 3D Cell Explorer microscope, we recorded a time lapse of rapidly dividing mouse embryonic stem cells which we sped-up:
By analysing frames from this data we will first identify the different phases of mitosis and determine how long each phase lasts. Then, we will observe the variation in the 3D structure of the cell during cell division.
Phases of Mitosis
Mitosis is a continuous process but can be divided into five distinct phases: interphase, prophase metaphase, anaphase, and telophase.
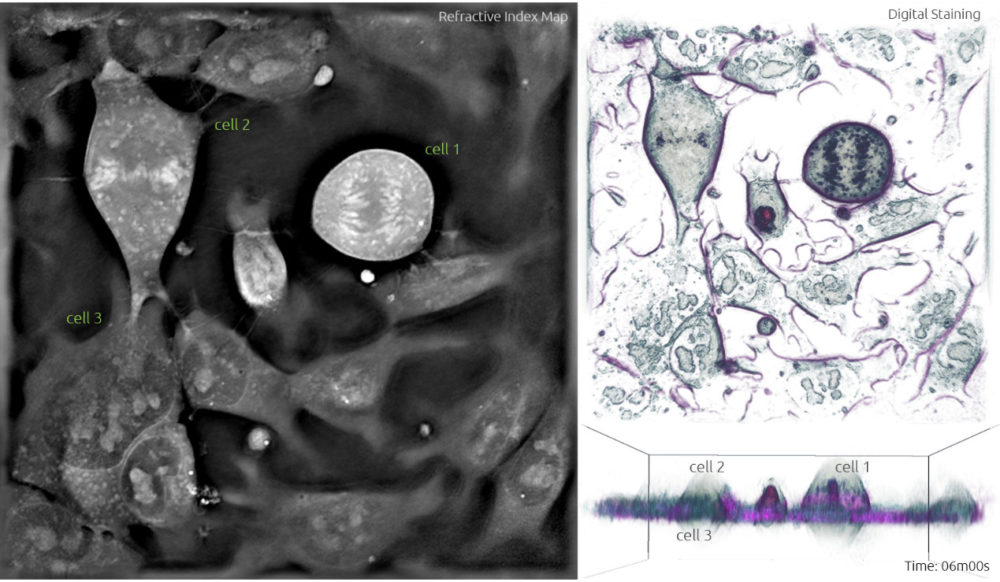
- During interphase, the DNA in the cell is copied in the nucleus in preparation for cell division, which results in two identical full sets of chromosomes. During this phase, the cells are flat, and the chromosomes are not visible because they are not condensed. In Frame 1, cell 3 is one of the many cells in the interphase.
- The cell is then ready to progress into prophase, which is characterised by the condensing of chromosomes into X-shaped structures formed by two sister chromatids containing identical genetic information. The chromosomes pair up so that both copies of chromosome 1 are together, both copies of chromosome 2 are together, and so on. During this phase, the cell adopts a spherical structure and the nuclear membrane dissolves while releasing the condensed chromosomes which are then easily distinguishable under the microscope. In Frame 1, you can see the chromosomes starting to condense and form the characteristic ‘x shape’ structure in cell 2.
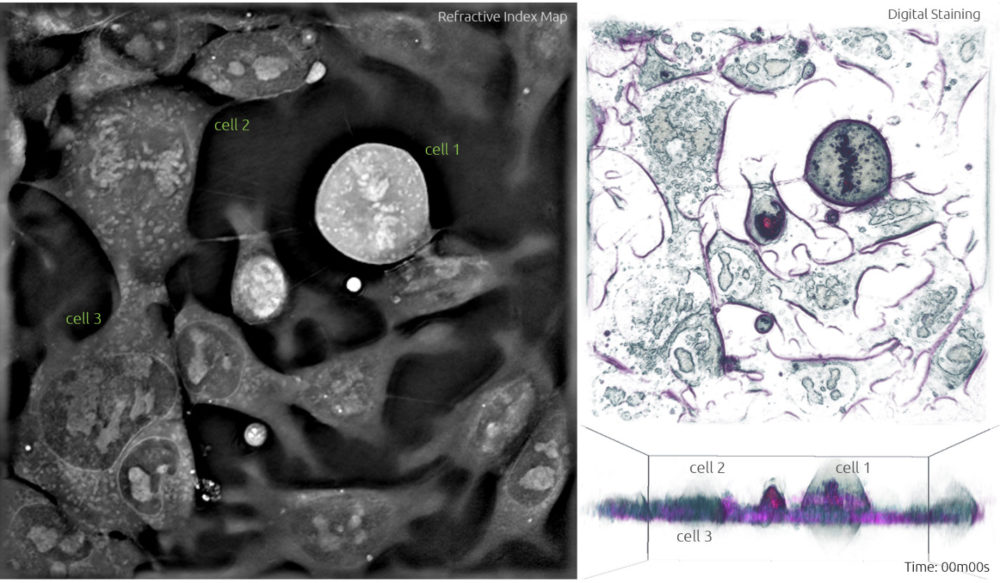
Frame 1: The left panel shows a grayscale image of the refractive index map acquired with the 3D Cell Explorer microscope. The top right panel is a ‘top view’ 3D render obtained from digital staining applied to the different refractive index values. The bottom right panel is the ‘side view’ 3D render viewed from another plane to observe the three-dimensional structure.
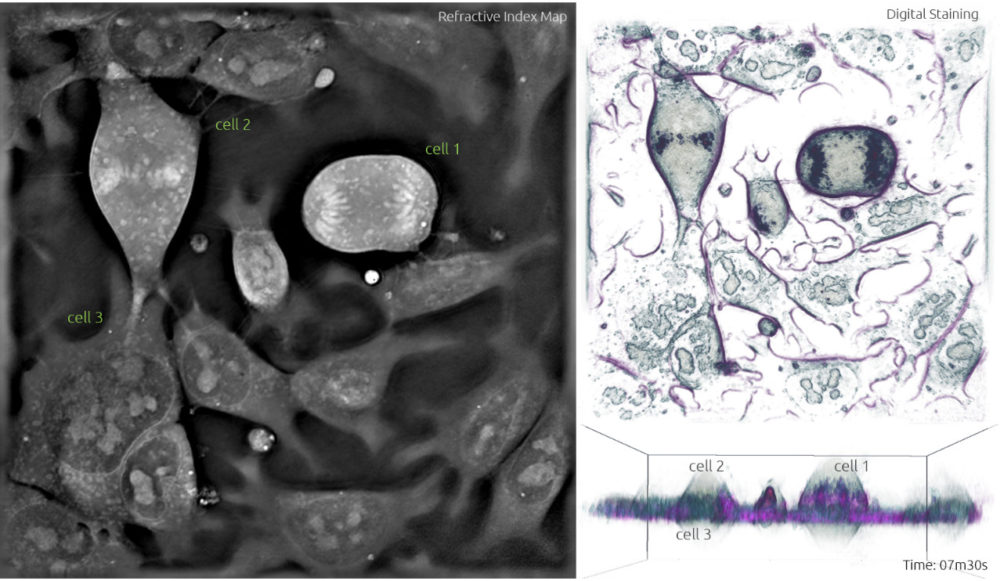
3. During metaphase, the chromosomes line up neatly end-to-end along the centre of the cell called the equator, and mitotic spindle fibres extend from the opposite poles of the cell towards the equator. Upon contact, the mitotic spindle fibres attach to each of the sister chromatids. This is clearly visible in Frame 2, where the chromosomes in cell 1 form an apparent line through the middle of the cell. Cell 2 is also adopting a more spherical form.
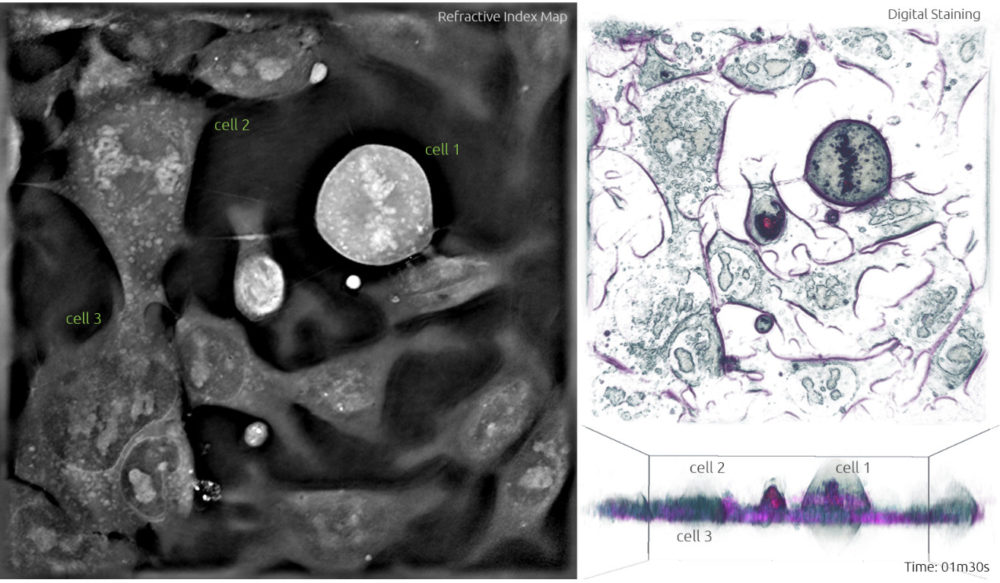
Frame 2
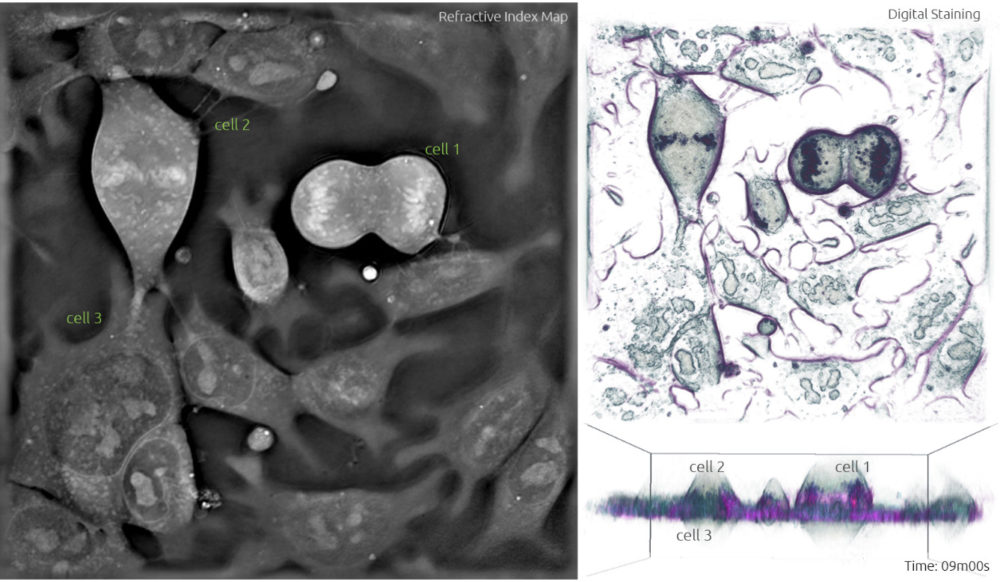
Frame 3
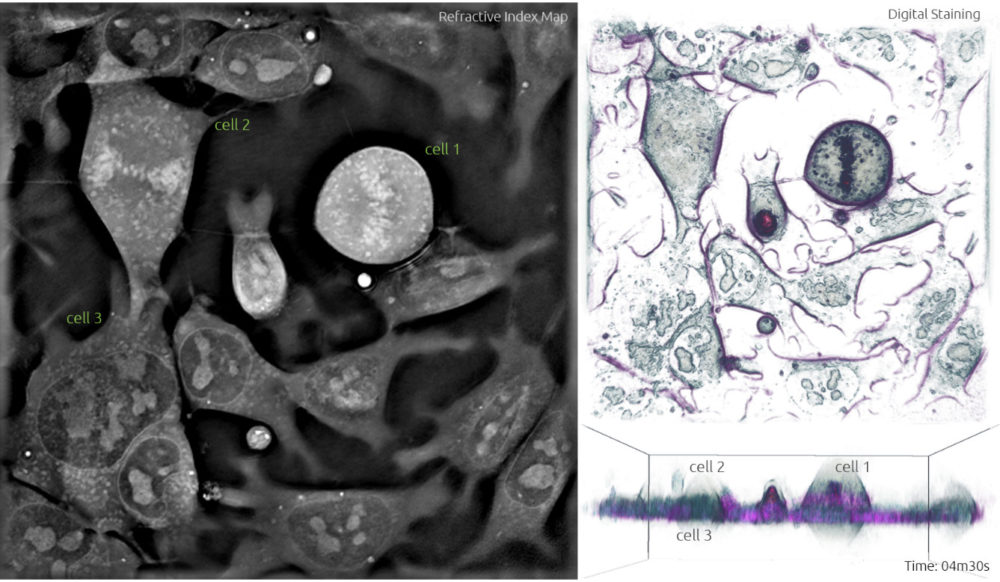
4. The following phase is anaphase. It starts when the sister chromatids are pulled apart by the mitotic spindle to opposite poles while keeping one copy at each extremity of the cell and gathering a full set of chromosomes. Compared to the previous image, cell 1 in Frame 4 shows two lines of chromosomes instead of the one line going through the middle -this highlights the separation of the sister chromatids. In Frame 5, these chromatids are being pulled further apart and this process will continue until the next phase. Notice how cell 2 is now in metaphase identified by the alignment of chromosomes in the equator.
Frame 4
Frame 5
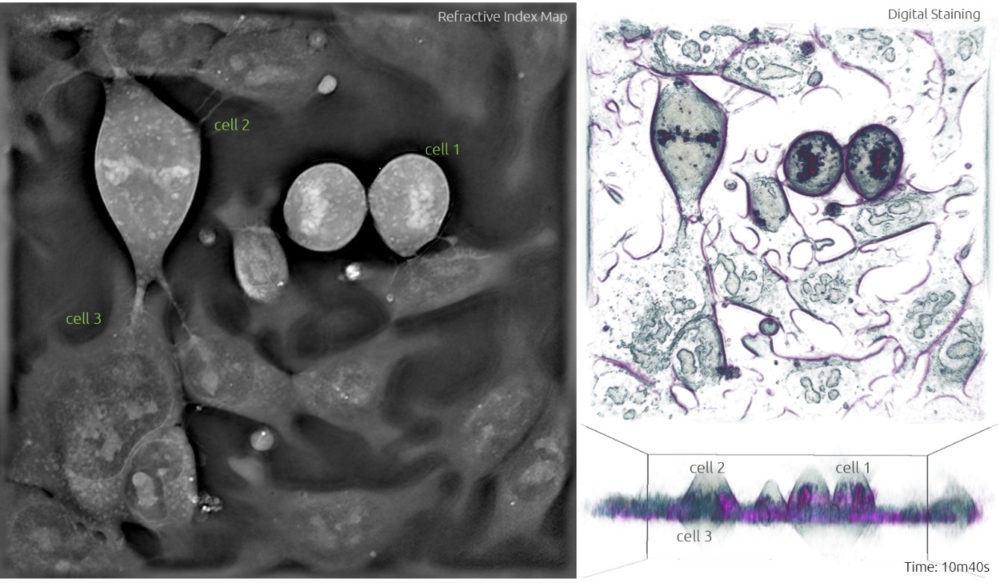
5. Once the two full sets of chromosomes are well apart, a membrane forms around each set to create two new nuclei during the telophase. The mother cell undergoes cytokinesis which is characterised by the pinching of the cell in the middle (Frame 6, cell 1) and separates to form two separate daughter cells each containing a full set of chromosomes (Frame 7, cell 1).
Frame 6
Frame 7
Duration of mitosis
The advantage of imaging living cells without perturbing them with chemicals is that we can make observations on their natural dynamics. For example, we can determine the duration of the different phases in mitosis in this line of mouse embryonic stem cells. The selected frames are 1min 30s apart and the time is indicated at the bottom right of each figure.
Anaphase (the separation of the chromatids) takes place in cell 1 between Figures 3 and 6, and therefore lasts approximately 3-4 min. Telophase is also quite quick and lasts approximately 1.5 min.
After performing such analysis for multiple cells at various time points, we concluded that the total duration of mitosis, excluding interphase, is approximately 30 min. The preparation steps during prophase (approx. 15 min) and metaphase (6 min) take longer than the division itself.
Cell height dynamics
The cell changes its shape from flat to spherical during mitosis. The change in height is apparent from the side view of cell 2 in the different frames as it advances through the phases of mitosis. This can be quantified by counting the slices which represent the depth of the signal in the refractive index map.

Slices
Cell 3 serves as a reference height for a cell in the interphase as it doesn’t change in any of the frames. In the animation above, we see that the height of this cell is 18 slices (from -14 to +4) in all frames. Knowing that the distance between two slices is 0.4 µm, we can determine the thickness of the cell in the interphase:18 * 0.4 µm = 7.2 µm.
As for cell 1, it is already in its spherical form during the metaphase in Frame 1, with a height of 34 slices (-14 to +20). And its daughter cells maintain that height after division (Frame 7). Hence, the thickness of a cell from the metaphase to the telophase is 34 * 0.4 µm = 13.6 µm, nearly twice the height of the cell in the interphase.
Cell 2 goes from prophase in Frame 1 to metaphase in Frame 7 with a change of the height from 21 to 34 slices which matches that of cell 1.
That’s it. Now we know more about stem cells as well as how to observe them. If you have a specific question ask Kulsum: education@nanolive.ch.
To try it yourself you can download a demo version of STEVE with the mESC mitosis data shown above: http://nanolive.ch/software/#trySteve.